This example will tell you how to use UIActivityIndicatorView class to implement iOS activity indicator both visually ( in the Main.storyboard file ) and programmatically in swift source code. First, let us look at the example demo video below.
1. iOS Activity Indicator Example.
- If you can not watch the above video, you can see it on URL https://youtu.be/TCVKqyr1i1c
- There are two buttons and two activity indicators in this example. The orange button and the activity indicator above it are added in the Xcode project Main.storyboard file visually. When you press the top orange button, it will start or stop the activity indicator above it.
- The green button and the activity indicator below it are added programmatically in the swift source code. When you press the green button, it will start or stop the activity indicator below it.
2. How To Add iOS Activity Indicator In Main.storyboard File Visually.
- Create an Xcode project.
- Click the project Main.storyboard file to edit it.
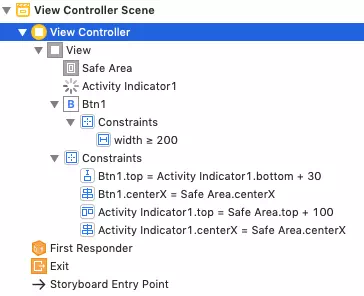
- Click Xcode View —> Show Library menu item to open the UI component library window, input activity indicator in the search box, drag & drop the Activity Indicator View to the Main.storyboard view controller scene. Then add a button in the scene also.
- Add below constraints to layout the activity indicator and the button.

- Select the activity indicator view object in the Main.storyboard file, then click Xcode View —> Inspectors —> Show Attributes Inspector menu item to open and configure the iOS activity indicator attributes ( such as Style, Color, etc ) in the right panel.
3. How To Add And Config iOS Activity Indicator Object In Swift Source Code Programmatically.
The project ViewController.swift file contains source code that adds the second activity indicator and button programmatically. Please read below code comments to learn more.
ViewController.swift
//
//  ViewController.swift
//  iOSActivityIndicatorExample
//
//  Created by song zhao on 12/17/19.
//  Copyright © 2019 dev2qa.com. All rights reserved.
//

import UIKit

class ViewController: UIViewController {

    // IBOutlet variable to reference ui component button1 and activity indicator1 in main storyboard.
    @IBOutlet weak var btn1: UIButton!
    @IBOutlet weak var activityIndicator1: UIActivityIndicatorView!

    // Button2 and activityIndicator2 variable is created programmatically.
    let btn2: UIButton = UIButton()
    let activityIndicator2 : UIActivityIndicatorView = UIActivityIndicatorView()

    // Button title string.
    let BTN_TITLE_START = "Start"
    let BTN_TITLE_STOP = "Stop"

    // Button tag values.
    let TAG_ONE = 1
    let TAG_TWO = 2


    override func viewDidLoad() {
        super.viewDidLoad()

        // Set button1's tag value.
        btn1.tag = TAG_ONE

        // Set button1's touchDown event process function.
        btn1.addTarget(self, action: #selector(processBtn), for: UIControl.Event.touchDown)

        initButton2()

        initActivityIndicator2()

    }


    /* This function will process button event. */
    @objc func processBtn(_ sender: UIButton) {

        // Get button tag property value.
        let btnTag = sender.tag

        // Get button title text string.
        let btnTitleText = sender.titleLabel?.text

        if(btnTitleText == self.BTN_TITLE_START){

            if(btnTag == TAG_ONE){
                activityIndicator1.startAnimating()
            }

            if(btnTag == TAG_TWO){
                activityIndicator2.startAnimating()
            }

            sender.setTitle(self.BTN_TITLE_STOP, for: UIControl.State.normal)
        }else{
            if(btnTag == TAG_ONE){
                activityIndicator1.stopAnimating()
            }

            if(btnTag == TAG_TWO){
                activityIndicator2.stopAnimating()
            }

            sender.setTitle(self.BTN_TITLE_START, for: UIControl.State.normal)
        }

    }

    /* This function create and layout btn2 to add it in app main screen. */
    func initButton2(){

        btn2.tag = TAG_TWO

        // Set btn2's property translatesAutoresizingMaskIntoConstraints value to false. So you can change btn2's layout programmatically in later swift source code.
        btn2.translatesAutoresizingMaskIntoConstraints = false

        btn2.setTitle(self.BTN_TITLE_STOP, for: UIControl.State.normal)

        btn2.layer.cornerRadius = 5

        btn2.backgroundColor = UIColor.green

        btn2.setTitleColor(UIColor.red, for: UIControl.State.normal)

        // Add btn2 to the iOS app root view.
        self.view.addSubview(btn2)

        // Active btn2's top, width, and center x layout constraints.
        let topAnchor = btn2.topAnchor.constraint(equalTo: btn1.topAnchor, constant: 100)
        topAnchor.isActive = true

        let widthAnchor = btn2.widthAnchor.constraint(equalTo: self.view.widthAnchor, multiplier: 0.6)
        widthAnchor.isActive = true

        let centerXAnchor = btn2.centerXAnchor.constraint(equalTo: self.view.centerXAnchor)
        centerXAnchor.isActive = true

        // Add btn2's touch down event process function.
        btn2.addTarget(self, action: #selector(processBtn), for: UIControl.Event.touchDown)
    }

    /* This function create and set layout constraints to activityIndicator2. */
    func initActivityIndicator2(){

        activityIndicator2.translatesAutoresizingMaskIntoConstraints = false

        activityIndicator2.color = UIColor.red

        activityIndicator2.style = UIActivityIndicatorView.Style.medium

        activityIndicator2.hidesWhenStopped = false

        self.view.addSubview(activityIndicator2)

        let topAnchor = activityIndicator2.topAnchor.constraint(equalTo: btn2.bottomAnchor, constant: 30)
        topAnchor.isActive = true

        let centerXAnchor = activityIndicator2.centerXAnchor.constraint(equalTo: self.view.centerXAnchor)
        centerXAnchor.isActive = true

        // This activity indicator will start animating when initialized.
        activityIndicator2.startAnimating()
    }
}