If you want to use Windows 7 in macOS, you always need to install VMware Fusion and create a Windows 7 virtual machine in it. You can read the article How To Install VMware Fusion Virtual Machine On Mac Correctly to learn how to do it. But after that, you may also need to share Wi-Fi and directory between MacOS and the virtual machine, this article will tell you how to do it.
1. How To Share Wi-Fi Between Windows Virtual Machine And MacOS.
- Open VMware Fusion, click Virtual Machine —> Settings… menu item in the top menu bar to open the virtual machine Settings dialog window.
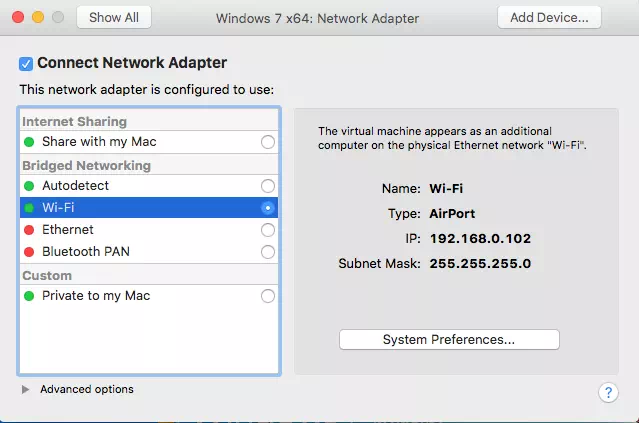
- Click the Network Adapter item in the popup virtual machine Settings dialog window.
- In the Network Adapter settings dialog window, choose the Wi-Fi radio button in the Bridged Networking section. Then close the dialog, now the windows 7 virtual machine can use the Wi-Fi which MacOS used to access the network.

2. How To Share Directory Between MacOS And Windows 7 Virtual Machine.
- Open VMware Fusion, click Virtual Machine —> Settings… menu item in the top menu bar.
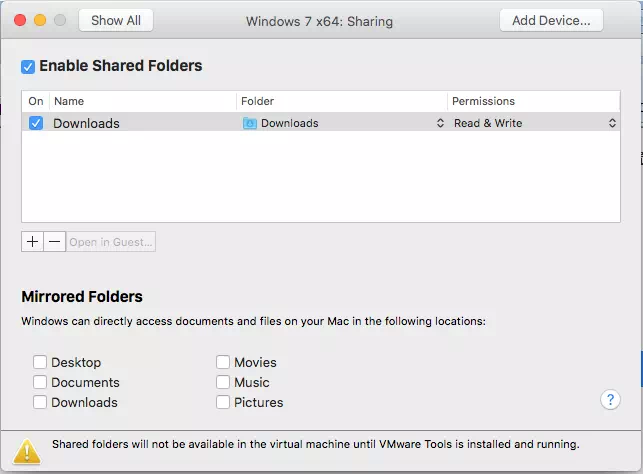
- Click the Sharing item in the popup virtual machine Settings window.
- Then you can see the below popup Sharing window for directory share configuration.

- Click the plus ( + ) button to select and add a shared folder. If you see the yellow warn icon at the bottom of the window like the above picture, it means you do not install VMware Tools for the virtual machine, so you should first install VMware Tools for it follow the below step.
- Click Virtual Machine —> Install VMware Tools menu item in the top menu bar to install it, this may take some time.
- After installing VMware Tools and configure the shared folder, you can log in windows 7 virtual machine to see the MacOS shared folder content in windows explorer or desktop.