After you develop and test your iOS app in the Xcode simulator, you also need to deploy your app to a real device such as iPhone or iPad device to run and test. Because some bugs only exist on the real device, so it is also necessary. This article will tell you how to do it.
1. Run Xcode iOS App in Real iPhone Steps.
- Connect your iPhone to a macOS machine with a USB line.
- Then in Xcode, click Product —> Destination menu item in the top menu bar. Then select your real iPhone device in the popup menu list under the Device menu.
- Then you can click the Run button ( triangle button) at the top to run the app on the target iPhone.
2. Run iOS App In Real iPhone Errors.
But during the above process, you may encounter some errors like below.
2.1 Real iPhone iOS Version Not Match Xcode App Project Target iOS Version.
- The error message is as below.
The run destination zhao iPhone is not valid for Running the scheme 'Button LabelExample'. zhao iPhone's i0S 9.3.2 doesn't match ButtonLabelExample.app's i0S 12.0 deployment target. Upgrade zhao iPhone's iOS version or lower ButtonLabelExample.app‘s deployment target. OK - To resolve this error, you should follow the below steps to change the Xcode project app iOS deployment target version.
- Click the Xcode project name in Xcode left panel.
- Click the Build Settings tab on the Xcode right side.
- Click the Basic item in the Build Settings tab.
- In the Deployment section, select your iPhone iOS version in the iOS Deployment Target drop-down list. Then this error has been resolved.
2.2 Requires A Developer Team.
- Although Apple does not require the developer to cost money to deploy and test the iOS app on the real iOS device since Xcode 7.0.
- But to run and test the app on a real iOS device, you still need a free developer account. Otherwise, you may see the below errors in the Xcode project Signing section.
- The error message is Singing for ” iOS App Name ” requires a development team. Select a development team in the project editor.
- You can see this error message by clicking the Xcode project name on the Xcode editor left panel, then select the target under the TARGETS item on the Xcode right panel, then click the General tab on the right panel top area, then scroll down the right panel to the Signing section, then you can see the error message in the Status section.
- Follow the below steps to resolve this issue.
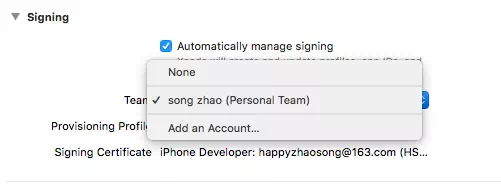
- Click the Add Account… button after the Team label in the Xcode Project —> TARGETS —> General —> Signing section. Then input an existing or register a new apple account id.
- After successfully login with the apple account, you can see the account in the Accounts window left side Apple IDs panel. Then close the dialog.
- Now you can select the apple account in the Xcode Project —> TARGETS —> General —> Signing section Team drop-down list.

2.3 This App Needs Trust Settings In Real iPhone.
- Before you can run the Xcode app project on a real iPhone device, you also need to trust the app in your iPhone, otherwise, you may encounter could not launch errors.
Could not launch “ButtonLabelExample” Verify the Developer App certificate for your account is trusted on your device. Open Settings on zhao iPhone and navigate to General -> Profiles & Device Management, then select your Developer App certificate to trust it. OK - Below are the steps to trust the Xcode app on iPhone.
- On your iPhone, click the General —> Settings —> Device Management menu item in the iPhone device. The Device Management menu item only appears when you run the Xcode app on the iPhone.
- On the Device Management page, click the app in the DEVELOPER APP section.
- Click the Trust button on the next screen. Then you can run the Xcode project app on your iPhone device. If you want to remove the trust, just click the Delete App button to remove it.
Great post! I’ve been struggling to run my Xcode app on my iPhone from Windows, and your step-by-step instructions made it so much easier. Thanks for sharing these tips!
Great post! I’ve been struggling to run my Xcode app on my iPhone using Windows, and your step-by-step guide was super helpful. The tips on troubleshooting connection issues were particularly useful. Thanks for sharing these tricks!