RelativeLayout is different from LinearLayout in layout rules. RelativeLayout is more flexible and allows the controls to appear in any location of the layout by a relative position. This article will introduce RelativeLayout and it’s properties with examples.
1. RelativeLayout Align To Parent Control Example.
- Android RelativeLayout has a lot of properties such as layout_alignParentLeft, layout_alignParentTop, layout_centerInParent etc.
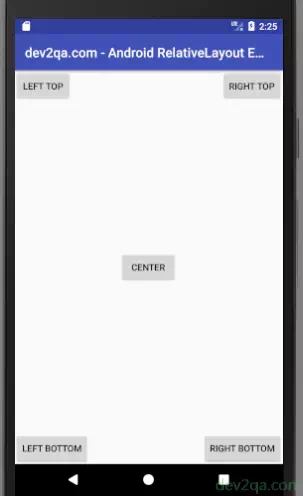
- But all those properties is easy to understand because the properties name is so clearly, they are all used to align controls relative to it’s parent layout. You can see some properties and it effects from the below example.
<RelativeLayout android:layout_width="match_parent" android:layout_height="match_parent"> <Button android:layout_width="wrap_content" android:layout_height="wrap_content" android:layout_alignParentLeft="true" android:layout_alignParentTop="true" android:text="Left Top"/> <Button android:layout_width="wrap_content" android:layout_height="wrap_content" android:layout_alignParentRight="true" android:layout_alignParentTop="true" android:text="Right Top"/> <Button android:layout_width="wrap_content" android:layout_height="wrap_content" android:layout_centerInParent="true" android:text="Center"/> <Button android:layout_width="wrap_content" android:layout_height="wrap_content" android:layout_alignParentLeft="true" android:layout_alignParentBottom="true" android:text="Left Bottom"/> <Button android:layout_width="wrap_content" android:layout_height="wrap_content" android:layout_alignParentRight="true" android:layout_alignParentBottom="true" android:text="Right Bottom"/> </RelativeLayout> - Below is the relative layout align to the parent ( container view ) example screen image.

2. RelativeLayout Align To Nearby Control Example.
- RelativeLayout also provides some other properties which are used to align controls to it’s nearby components. Such as layout_above, layout_toLeftOf, layout_toRightOf, layout_below.
- The value of the above property should be an existing component’s id.
- Please note, the existing component’s XML definition should be placed before other components which will be located relative to it in the layout XML file, otherwise, the project will throw compile error.
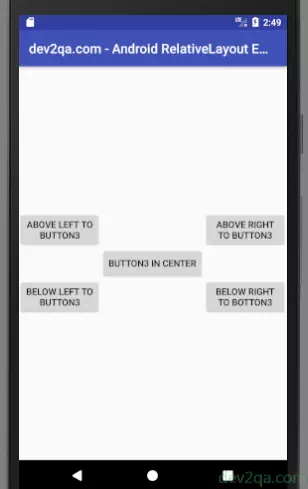
- Below is the relative layout align to the nearby control example XML configuration data.
<RelativeLayout android:layout_width="match_parent" android:layout_height="match_parent"> <Button android:id="@+id/relativeLayoutButton3" android:layout_width="wrap_content" android:layout_height="wrap_content" android:layout_centerInParent="true" android:text="Button3 In Center"/> <Button android:id="@+id/relativeLayoutButton1" android:layout_width="wrap_content" android:layout_height="wrap_content" android:layout_above="@id/relativeLayoutButton3" android:layout_toLeftOf="@id/relativeLayoutButton3" android:text="Above Left To Button3"/> <Button android:id="@+id/relativeLayoutButton2" android:layout_width="wrap_content" android:layout_height="wrap_content" android:layout_above="@id/relativeLayoutButton3" android:layout_toRightOf="@id/relativeLayoutButton3" android:text="Above Right To Button3"/> <Button android:id="@+id/relativeLayoutButton4" android:layout_width="wrap_content" android:layout_height="wrap_content" android:layout_below="@id/relativeLayoutButton3" android:layout_toLeftOf="@id/relativeLayoutButton3" android:text="Below Left To Button3"/> <Button android:id="@+id/relativeLayoutButton5" android:layout_width="wrap_content" android:layout_height="wrap_content" android:layout_below="@id/relativeLayoutButton3" android:layout_toRightOf="@id/relativeLayoutButton3" android:text="Below Right To Botton3"/> </RelativeLayout> - Below is the relative layout align to the nearby control example screen image.

3. RelativeLayout Login Example.
- RelativeLayout provides some other align properties such as layout_alignTop, layout_alignBottom, layout_alignLeft, layout_alignRigt.
- These properties are all used to align different components in different borders. The value of the above property is another component id included in the same RelativeLayout.
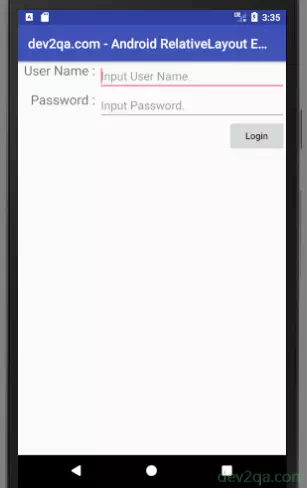
- The below example uses all the introduced RelativeLayout align properties in this article to create a login form in the android app.
<RelativeLayout android:layout_width="match_parent" android:layout_height="match_parent"> <TextView android:id="@+id/relativeLayoutUserNameTextView" android:layout_width="wrap_content" android:layout_height="wrap_content" android:layout_marginLeft="10dp" android:text="User Name : " android:textSize="20dp" /> <EditText android:id="@+id/relativeLayoutUserNameEditText" android:layout_width="match_parent" android:layout_height="wrap_content" android:layout_toRightOf="@id/relativeLayoutUserNameTextView" android:hint="Input User Name."/> <TextView android:id="@+id/relativeLayoutPasswordTextView" android:layout_width="wrap_content" android:layout_height="wrap_content" android:layout_below="@+id/relativeLayoutUserNameEditText" android:layout_alignRight="@+id/relativeLayoutUserNameTextView" android:text="Password : " android:textSize="20dp"/> <EditText android:id="@+id/relativeLayoutPasswordEditText" android:layout_width="match_parent" android:layout_height="wrap_content" android:layout_alignTop="@id/relativeLayoutPasswordTextView" android:layout_toRightOf="@id/relativeLayoutPasswordTextView" android:hint="Input Password."/> <Button android:id="@+id/relativeLayoutButton1" android:layout_width="wrap_content" android:layout_height="wrap_content" android:layout_below="@+id/relativeLayoutPasswordEditText" android:layout_alignRight="@+id/relativeLayoutPasswordEditText" android:text="Login" android:textAllCaps="false"/> </RelativeLayout> - Below is the login example screen image.
